Moving forward with my ideas, skills and context


One of the people working at the Stradling gallery brought to light about “the whole dilemma about makers, they make things which are tactile. I think when a maker makes something most of the time they’re not thinking well maybe it’s going to be on a shelf and never be touched again.”

It’s very important that my objects are picked up and handled. I want people to feel an emotion. Even if they don’t like it!

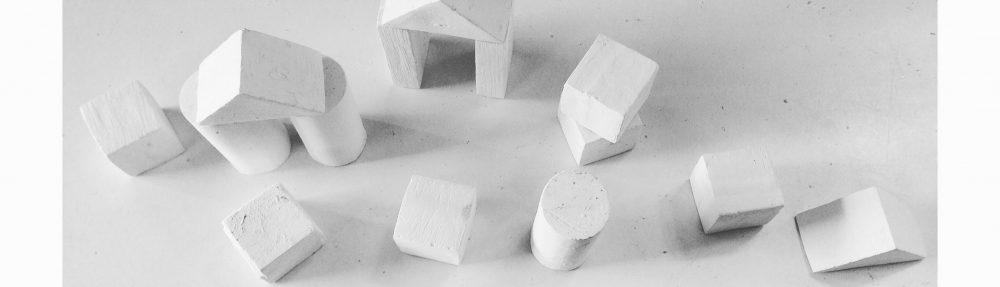
My next step from simply responding to the materiality of clay and its capacity to record the activity of sitting etc was to appy actions of resting to thrown forms. This of course lends a more thought out and skilled approach to the concept; as I haven’t just recorded an action in clay straight out of the bag or that’s been rolled out; I’ve made an object with a particular shape to be misshaped through an act of resting.

It’s then this mishap of the pot, which I want to incorporate in the handling of the pot. So if I made a dent in a vessel through a particular action; where pressure pushed against the clay would have pushed another part of the pot out. This would be where people pick up the pot.

I want to govern where the pot is misshaped and to what angle; so it can be used as a mug. This leads to me researching the ergonomics of a mug/ cup. So my idea has evolved from chair to comfort to mug. I believe this is a circle more than anything though, as when one drinks a warm drink they normally do so sitting down. It’s that notion of one sitting in a chair, in the gallery, admiring the Ken Stradling collection, whilst drinking a cup of tea.

So I need to spend more time on the wheel; and explore more textures to accentuate the areas of pressure applied to my pot. I want to explore warmth. For example the heat distribution when one sits on a chair and gets up off it. Another person would sit down on it and it will still be warm- in some parts. Maybe I could create pots with varying thickness; the heat transfer is different depending on where one holds the mug.

IMG_2554

This is a photograph from my instagram, of a porcelain jug I’ve made. See how where I have pinched in has made a pourer and an area for one to hold the jug.

Fo[u]r Rooms: Designing the Centre Piece and Spoons

Inspired by David Rhys Jone’s work, we have decided to incorporate a centre piece within our Machine Aesthetic themed room. This will be placed on the table, which will be made of scaffolding wood. The idea is to create an interlocking shape; inspired by the connecting of different components within machines, much like cogs working together.

david rhys jones

Initially I played around with clay, chopping up leather hard chunks at various angle to see what happened. And adding impressions of nuts and bolts etc.

Realising that I wanted a table piece which be around 30 cm squared and 15 cm tall, I wouldn’t be able to make a solid piece out of clay; as it would explode in the kiln during bisque firing. I would have to make it hollow.

I then thought about how I would split the sections of this table piece up. And it was then I had a light bulb moment. To make a ceramic puzzle, which, when taken apart would reveal images of the machinery used to construct the very items in our room!

After experimenting with various angles and lines, I settled on a square which would be split up into six units. These unique shapes would form a puzzle. Instead of the piece just pulling apart, it involves interlocking shapes; something quire challenging to make. I am still not entirely sure how I’m going to create this.. whether to go the casting route or slab construction… we will see.

IMG_0323IMG_0324

IMG_1053

Accurate Measurements of the centre piece. This is important for me to get right; otherwise the puzzle pieces will not slot together.

IMG_1054

IMG_1064

Blue foam maquette with pictures I wish to place as decals on the final ceramic piece.

And then there’s the spoons! I’ve literally never made anything quite like cutlerly before, so I’ve definitely set myself up for a challenge. But without a challenge there’s no fun to be had. And I will potentially develop a new skill from this- I will be able to make spoons!

I’ve looked at a few designers, some being on Etsy and others on instagram… These are the ones I particularly like:

Screen Shot 2016-02-14 at 23.08.04


IMG_0410

I particularly like this angular spoon. Rather like a stirrer. The function of this spoon is very limited-could maybe pick up a few sugar granules- but it looks great!

Keeping the industrial feel, I’m working with terracotta, It’s a great clay to sculpt with and records textures well, especially when paired with oxides after bisque firing. I think, rather than make, say 6 spoons individually, I will make one prototype and use that as a master copy and make a cast of it. That way, all the spoons will be the same shape and size. Since this is based on the machine aesthetic, I think it’s important to keep a regularity within the spoons, much like things would be repetitively manufactured using machines in a factory.

IMG_0315

Image taken from drawings in my sketchbook

IMG_0307

My first ever experimental spoons. These are quite small, smaller than a regular tea spoon.

IMG_0310

Some more detailed sketches of possible spoon shapes

IMG_0343

Second batch of experimental spoons, still wasn’t happy with these shapes, asking the others what they think of them. They liked the far right hand one.


Fo[u]r Rooms

So our 5 weeks are up; half our project is complete! How did I find it? Well I think as a team we gelled, those who turned up regularly to the meeting anyway. Another girl Sophie, who also does Ceramics joined our group during the 3rd week. During the 2nd week we assigned different members of the group to make different components of the room.

Jon, Connor and Fintan were keen to do the table and they, out of all of us have the most experience working with wood (which is what we want to make the table out of). The plan is to get hold of some scaffolding wood and either sand it down or wax it.

IMG_0920

April and Jon will be doing an anamorphic wall piece, so from one angle the word widget will be able to be seen, but from other angles, it will look very abstract. Don’t have any pictures of the proposed idea.

Connor and Emma are going to be doing lighting. I know Emma is keen to create tube lighting. Emma’s also making a large metal nut.

emmas lighting

emma's nut

Cameron is creating cups and aims to throw and turn 100 pots to decorate the shelving (which Emma plans to make using cable ladder)

IMG_0919

Laura is doing soft furnishings, so cushions. This will make the table a lot more comfortable to sit at

IMG_0922.JPG

I am making spoons; we feel this will be a nice addition to the meeting room, as people can stir sugar into their coffee! And I’m also doing a the table centre piece: which will be a ceramic puzzle.

IMG_0323


IMG_1086

IMG_0050.jpg

Our wooden model of the room

IMG_0052.jpg

Cam and I’s clay idea of the room; before it was fired

It is quite difficult at times since there’s 9 of us to gather all our creative ideas together; we all have separate designs which, of course all link together, but it seems that- well the feedback that we got from Richard (the main lecturer of this module) was that- we are taking individual ownership on each of our designs. I had to mull over this for a bit, then I realised; okay I know that Emma for instance is making a light fitting, but what material is she cladding the fluorescent lighting tube with? Or that Connor and Fintan are creating the table; but what wood are they using? I should know this straight away off the top of my head; but I don’t. I think all of us need to be more involved which each other’s design process. What can we do to change this? Perhaps we could make a weekly summary of our progress with detailed descriptions of each design for the room. This could be verbally discussed and placed on our Facebook group. Another thing that would be highly useful is a Gantt chart so we all know what we’re supposed to be doing and when; essential for keeping track. FYI a Gantt chart-named after Henry Gantt, American mechanical engineer and management consultant- was invented in the 1910s. A diagram made in Excel represents projects or tasks in the form of descending horizontal bar charts. I know that Emma has drawn one but we need one digitally made and accessible for everyone.

So  I’ve literally just aired my suggestions on our groups’ Facebook page… Once the conversation gets started I will offer to do some bit and bobs over christmas; so we can hit the ground running next term.

*UPDATE* here is our Ganntt Chart

Four Rooms Gantt Chart

Materials involved in creating pots

Thought I’d do a post reflecting my knowledge so far in understanding glazes…Normally I make ceramic pieces with white St Thomas, it’s a very flexible clay body and has quite a broad firing range, meaning I can be pretty adventurous when it comes to glazing.

Talking about glaze, I recently made a blue/green glaze from one of Spencer’s (a fellow 2nd year) recipes.

It consisted of pot ash feldspar, whiting, tin, titanium and copper.

I wanted to do a bit of research into the properties of ceramic glazes; as I haven’t really looked at the chemistry behind them. Whilst researching, I found a short, informative video by a man called John Britt on the 3 key components of a ceramic glaze: refractories, fluxes and glass formers.

I then tried to work out which ingredient of the recipe was what component… I think that

Pot ash, also known as potassium feldspar is the flux. The flux is an accelerating agent meaning it speeds up the reactions of chemicals in a reaction.

Whiting aka Calcium carbonate, is it’s name suggests a whitener. Its job is to make the glaze more opaque.

Titanium (I used titanium dioxide) is for crystallising the surface, which in turn makes beautiful patterns in the glaze; much nicer than a plain one in my opinion.

And last, but not least, is Copper. I used black copper oxide and a touch more than what the recipe stated, therefore

the glaze came out more of a richer green (on the whole; there were areas on some of my pots with specks of sky blue). This makes sense as if the copper makes up for over 5% of the glaze, green colours develop. However anything below is more bluey. And, excitingly, if this glaze were put in a reduction (less oxygen present) firing, vibrant red hues could be present!