Plans after graduation

I have been in the education system for nearly 20 years, so I would like to have a break from education after graduation. For six months I will be working full time, saving money for travelling in January 2018.

I will be going to New Zealand, Australia and Thailand, coming back to the UK at the beginning of March. This will be a massive source of inspiration for me, a complete change of natural environment compared to the UK, there will be plenty of moments I can sketch. I am especially looking forward to going on the 90 mile beach in Auckland and exploring modern architecture- such as the Opera House- in Sydney as well as century old temples in Thailand.

I am currently researching into buying a small kiln so I can start making things at home over the weekend, on my days off.

And then next year I wish to do INC space. I feel I need a year to step back in order to re-focus; and to get a detailed business plan together.

Along with this I wish to volunteer at the Pitt Rivers museum, having sent off an application to be an object handler, I am waiting to hear back from them! This will be a brilliant place to extend my contextual ceramic knowledge as well as share my passion of the material with the public.

I am exhibitng my degree work at New Designers the following month and also  going to Hatfield in August. In preparation for this I have made business cards and my website will be complete on the day of my degree show ready for the public to look at.

The creativity never stops, I am continuing to make in the studio, as its essential I have enough stock for Hatfield. I am selling my tiles as table coasters. Because of their tessellating nature, customers can buy just 3 or more, and play with the composition, giving them the option to use their creativity and make interesting arrangements for their dining and coffee tables. imageIn the long term, it would be a dream come true to do a Ceramics residency at the V&A. About a year ago I had a really interesting chat with Amy Hughes during her open studio day. She made fantastic coil built vases, inspired by pieces from the museum. It excites me to think that I could cast century old ceramics from the V&A’s ceramics collection and use parts of them to create other objects in completely new and innovative ways.

Alos, Thomas Heatherwick is a huge source of inspiration and the projects he has done with the Heatherwick’s Studios are amazing. To have a large scale installation/sculpture in a building like he did in the Wellcome Trust headquarters with Bleigessen is the pinnacle of my goals.


Subject Reflection

image
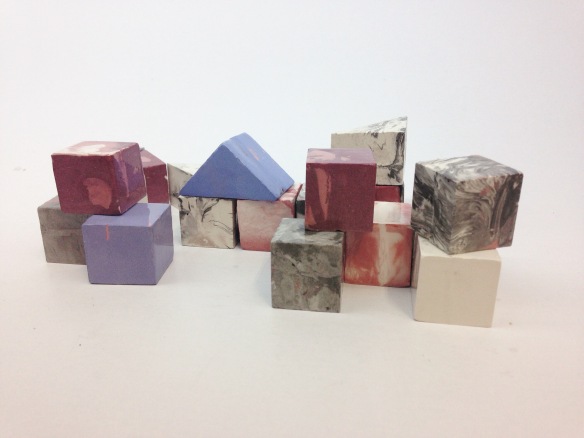
Over the course of my degree, I have learnt that my interest lies in geometries. I thrive in the satisfaction of transforming a lump of squidgy clay into a collection of angular Tessellating shapes. The manifestation of my ideas evolved from linear patterns to geometries. I began to decorate 3D slab constructed vessels with optical illusions, and was very concerned with the surface. The theme that remained the same right from the start of the year was my production of Interlocking forms. I began first by making 3D tangrams. This then of course evolved to Tessellating tiles. It was vital for me, that the tiles created an optical illusion which submerges the audience into an enhanced, dreamy mood. I am delighted at how my ideas developed as it has enabled me to go down a completely new avenue of creating wall pieces that can be both an installation in a gallery or functional bespoke tiles.
It was essential that I used cobalt blue stain in the making of the slips, the colours are all cool and refreshing, adding to the enhanced mood I wish to give the audience. They also had to be satisfying to look at, so they all combine well, with no two colours touching each other. This was very enjoyable for me as I had chosen these specific colours and was pleased with the outcome when it came to composing them on the wall. I am truly happy with physical outcome of my idea development. I am my own worst critic so for me to say the more I look at my tiles the more I like them is something!

Creating these tiles required me to step outside of my comfort zone, it had always been my wish to creat such smooth straight shapes, and in order to do that o felt my best option was to make plaster moulds of laser-cut Perspex shapes. A positive of this it that I had worked in the plaster room quite a lot in the previous academic year, creating my building blocks moulds and making slip casted spoons. However, I had never used illustrator before and hadn’t really stepped foot in the soft modelling workshop during my degree. I was actually quite nervous about doing this as I don’t see myself as a “digital person” and felt I would make silly mistakes. Worries aside, I did it, and I’m glad I used this digital approach… Not only were the soft modelling technicians incredibly helpful, I was surprised at how relatively easy the process was. In my head I was making a bit of a mountain out of a mole hill!
Moreover, I have gained a new skill and I will definitely be progressing with more designs on illustrator after I graduate. Is also worth noting that I’ve mastered my finishing techniques; a process I will stick by in the future: spend time making quality, pristine moulds. The neater that are the less work you have to do later on the castes article. Even with lovely moulds, I had to sand all my tiles after bisque, to keep their sharp appearance which for me was so critical in the composition, as the tiles will slot together smoothly, lending to the 3D illusion. To my delight the final kiln firing was a success without any breakages, I was like the Cheshire Cat when I unloaded my kiln!

The contextual research which helped pave the manifestation of my ideas had a lot to do with two things, architecture and colour. Interestingly, my trip to Rajasthan in Level 5 provided a massive source of inspiration for me, it was truly an assault to the senses, and the variety of beautiful architecture has been stamped in my memory. The most inspiring source of deign were indeed the step wells. The repetition of steps continuing downwards in an inverted pyramid was so satisfying for me to observe; the continuation of steps re,indeed me of Escher’s impossible landscapes which then resulted in me looking at Reutersvard’s 2D impossible shapes. This was the seed which planted my interest in optical illusions .
I must say it took me a while to work out where my original source of inspiration came from for the degree show; I had to retrace my steps. Going through my photographs on Instagram helped me discover my trail of inspiration; it provided a timeline of condensed research. This tied with our blogs set the scene; I would often go back to posts I wrote a few years ago, and it’s amazing how relevant some of them are to my current work.
Lastly, but not least, colour was key. Whilst I was creating certain colours- Celadon, Prussian Blue, Puce and Ultramarine- I realised how much I thrive in deciding what colours go together, and there significance- both culturally and psychologically. For example, green is known as being a calming colour, reducing eye fatigue which an be caused by looking at red – hence the reason why hospitals are full of green floors and surgeons often wear scrubs of that colour. The fascination I have for colour and the stories behind each one encourages me to explore and research them more after I graduate; retaining an emphasis on my colour palette in future projects.

Ideas for pattern within the composition of my tiles


Using photoshop, I took existing photographs of my tiles and duplicated them to produce patterns. It’s refreshing to use a different medium of exploring composition rather than my usual cutting out printed out pictures and collating them in my sketchbook.
It’s also interesting visually looking at the outcome when only a few colours are used. With a repeated pattern and only two colours, it gives an entirely different, more orderly feel to my pieces. I see this as a positive as it means they can be used for different purposes and maybe blend in to the interior of a house rather than being a statement piece of wall art.

I particularly like the rotating grey marble rhombus. Repetition proves a nice contrast to the random nature of the marbled effect. Also, just the blue and green Tessellating tiles on their own look very formal, and extends their possibility of being used in more of a corporate, stricter environment.

The star arrangement with the pale blue marble, blue and green lends itself to a more traditional Asian interior; so this ties the designs nicely back to my original source of inspiration: Rajasthan.

Green is good

Expanding on colour, I am very intrigued by the calming properties green has. Since one of main aims and ideas is to enhance the mood of the audience: for them to slip into a daydream, choosing the right colours is a necessity.

I initially researched the effects of greens and blues. Green was originally introduced in hospitals to reduce the glare of traditional hospital whites. Also it is a sign of health and wellbeing: Healthy plants always have fresh green leaves.And blue is often associated with calmness, like calm waters in the Mediterranean for instance, and a clear blue sky.

Although I am not designing these tiles for a hospital, I found a very interesting study by the NHS on colour in hospitals.

The information I read can be applicable anywhere, not just in hospitals. Green also provides a high contrast environment, reducing eye fatigue caused by looking at too much red (blood). Perhaps this is why the Royal Infirmary in Cardiff decorated this space pictured above with green tiles.

It also makes red blood splashes ‘less conspicuous”. Overall, the colousr of my tiles are pretty easy on the eye, but still capture the audience’s interest through the optical illusions the tiles make up. Interestingly, the best colour for judging colour is grey, so by slotting in my marbliesed grey tiles,it refocuses one’s attention to the puce, ultramarine, celadon and prussian blue tiles.


Hexagonal mould troubles

I have just about had enough of the plaster room, after making my hexagon mound three times, I was hoping it would be third time lucky: I would successfully take the epoxy resin backed Perspex fronted hexagon out of the second part of my two piece plaster mould.

image
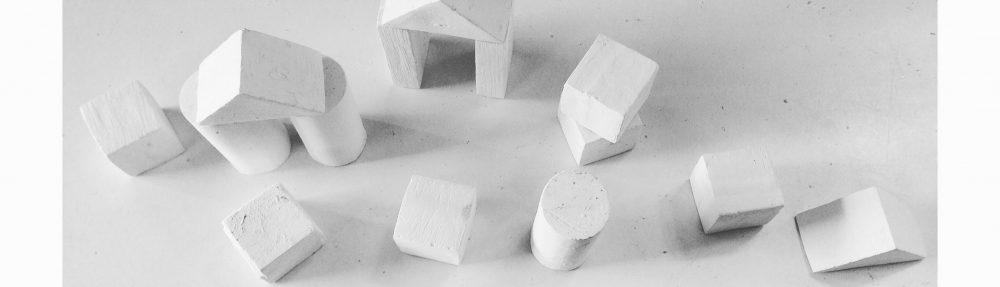
But this did not happen. It just wouldn’t release, I used compressed air gun, water, I’d even spread a thin layer of engine oil onto the piece prior to moulding. Had it been earlier on I the year, I would have tried casting this complex shape using a different material.. But I have made an executive decision to put this aside and concentrate on making tile with the mounds I already have. I justified it with the fact that I would have to learn to use a new material such as silicon or using a CNC machine; and at the moment my knowledge lies with plaster. Time is of the essence and at this point of the year I need to go with what I know.

IMG_6022On a positive note, if I hadn’t designed this shape, I wouldn’t have had my 3 separate rhombuses as a result of being the shapes pushed out of hexagon during laser cutting. Also, I am very happy with how the tiles I have are looking, so I don’t feel I need another shape in the composition anyway.

Why I picked certain colours for my tile collection

I wanted to create rich colours which all had blue in them as it is a shade I have always favoured to work with. These include pink, green; plus various shades of blue to compliment each other, when it came to making along with Ivory white tiles in between.
I took time to choose the colours because of the significant history behind how they were discovered. The process of making them involved using high fire stains: cobalt blue, crimson red, black and yellow.

image

I did some experimentation before, mixing different percentages of blue with the other colours, evidenced in my glaze book. I may use the combinations at a later date, but for the degree show, I wanted these particular 4 colours…

Prussian Blue, the colour of blueprints and an antidote to heavy metal poisoning; was appreciated by artists for its prominent colouration, whereas most blues have a green hue to them.It was also used for the Prussian army’s uniform in the 19th century: a colour of power.

image

Puce was a pink signifying indulgence: one of the last dresses Marie Antionette owned was Puce. Interestingly, it translates to meaning the colour of fleas: when Antionette’s husband, King Louis, saw the dress he remarked that it was of a flea colour “coleur de puce”.

Ultramarine, originally derived from Lapiz Lazuli, was adored by many Renaissance artists for its deep blue pigmentation, at the time it was so valuable (used to depict the robes of Virgin Mary) the blue stain itself was locked away from the artists whilst they were completing the task of a commission painting.

And lastly Celadon, renowned in Ceramic history, a green glaze used to decorate pottery in China, it became very fashionable and spread to other parts of Asia and then Europe. Interestingly, the original celadon wares weren’t even seen until a few decades ago, after archeologists found them hidden away in underneath old Chinese temples.

image


Beauty lies in the detail

IMG_5864

The devil is in the detail! Pictured above is one of my perspex rhombuses I was preparing to cast. Using clay to stick it to the board and to fill in the minute space underneath ensured that the mould would be as clean and neat as possible. I also used a spirit level to check for straightness. 

So I had a bit of a melt down last week, my moulds for my tiles didn’t work, due to the Perspex pieces I had casted not being completely clean; I did not think that the plaster would pick up the detail, but it did. Also with my bigger hexagonal mould, I only used soft soap as a release agent rather than another material which was appropriate to resin board; this meant the shape being casted would not release, and I actually had to smash the mould to get it out! This put me back with making and meant that I didn’t have the tiles I originally wanted finished. However frustrating this was, I don’t see any hiccup as a failure, just a learning curve! So I cracked on with making a new set of moulds. After having a tutorial with Gemma-one of the Ceramics Technicians- I ended the week being confident in my abilities and having a load of casting tips. It is all in the detail when creating my tiles and if it wasn’t for me mucking up the first batch of moulds, I wouldn’t have learnt new finishing skills and tips from Gemma. Because they are so simple, people will zoom in on any impurities, so they simply must be perfect. By being very precarious from the beginning of the making process it will make things a lot easier when it comes to the firing part, and it means I don’t have to spend as much time neatening them up after a bisque, as the moulds are super pristine in the first place.


IMG_5894

If I wanted something flat, the key was to use flat tools. If I wanted a straight edge, I used straight edged tools etc. Gemma pointed this out to me and al though this seems obvious but sometimes, it just takes someone to tell you for you to realise! To make sure that the hexagon didn’t get stuck the the plaster, I sanded any bumps and applied a couple of coats of beeswax to the resin board.

IMG_5925

My three rhombus moulds, all clean-cut, pristine and in use! 

Jackson Pollock

World renowned artist Jackson Pollock is the painter most well associated with the abstract expressionist movement. He adopted a unique technique of painting, detaching line from, colour and reaching new possibilities in the art world. Starting off with putting the canvas on the floor, Pollock often used household paint, dipping a large push into the paint pot, and drizzling the paint onto the canvas, in a seemingly random way, usually whilst intoxicated. The motion was much like a swinging pendulum.

I have been inspired by his approach to painting, and the ambiguities of the process. I feel like the way in which I make my marbleised tiles is similar; as I am working vertically on to a flat surface; mixing two three of four colours together, without measuring them. It is very intuitive, and I go by how it feels. Something which contrasts with my carefully construed design of diamond and rhombus tiles; and the patient process of making accurate, neat slipping casting moulds

Colour

To start with I was quite set on the possibility of using Pantones colour of the year “Greenery” for a main colour on my tiles… However, it is very bright, and for me a bit too bright! It isn’t really part of my “go-to” colour palette. After all this is work I am creating for my degree show, I want to use colours I am fond of… Although it’s for other people to come and see our talent (including buyers and people from industry), it’s our opportunity to show off an accumulation of what we have learnt throughout our ceramics degree.

I have started to research colours for my tile collection. Colour, to me is just as important as the design itself. I am constantly observing my surroundings, and seeing which colours work well together or maybe clash, and how they affect people’s moods.

I have come across the fabulous book “The Secret Lives of Colour” by Kassia St Clair. In this book she writes about the histories of 75 shades, dyes and hues. Each story is unique and compelling, making me question every interesting colour I come across…

Ever since I have begun involved with Ceramics, cobalt blue is a colour I have always worked with, I am always magnetised to it. So it made sense to start with this colour to create other ones. I began by mixing cobalt blue with red to produce stunning shades of purple and pink; these were the only stains I had. So I invested in black and yellow. With these base colours, my options are limitless! I chose stains over oxides, as I wanted the colour to retain even at high temperatures, as I was firing to 1220 degrees. I just wanted trustworthy colours; with oxides there is always a risk that they will burn out.

IMG_5710

Stacked up cubes

The cubes pictures above are test pieces I created to see how the blues and pinks would work together. I also created a few using a marbleised effect, to contrast with the pristine lines: which would be a similar pairing if this effect were to be used on my tiles. Whilst the diamonds and rhombuses I have made echo the repetition of shapes and tessellation apparent in nature, the marbleisation symbolizes the more unusual side of the organic. This could be an extra petal on a flower, for example, or the ever-changing weather. Even with a forecast, which predicts transformations in the atmosphere based on pattern, there is always an anomaly.